
Problem
In the world of enterprise cloud services, RDS (Relational Database Service) is the sneaky third wheel when it comes to costs, right after the heavyweight champions, EC2 and Storage. One of the most elusive expenses within RDS is its backup costs, often slipping under the radar like a stealthy ninja. In this article, we’ll shed some light on how to uncover these hidden costs and provide actionable steps to save money.
Key Takeaways
- Understand RDS Backup Costs: Use AWS Cost Explorer to gain visibility into RDS backup expenses, even without tagging.
- Importance of Tagging: Tag your databases and snapshots for detailed cost analysis and better management.
- Automate Cost Optimization: Implement AWS Lambda to automatically delete old manual snapshots and prevent cost accumulation.
- Stay Proactive: Regular monitoring and tagging help in staying on top of expenses and avoiding unexpected costs.
RDS Automated Backup vs Manual Snapshot
When you create an RDS DB, Amazon does the heavy lifting by automatically managing your backups and retention. RDS takes a storage volume snapshot of your DB instance, covering the entire instance, not just individual databases. By default, backups run daily with a 7-day retention period if created via the console, or a 1-day retention if created using the CLI. The first backup is a full snapshot, with subsequent backups being incremental.
While these default settings might seem fine at first glance, large enterprises often require more frequent backups and longer retention periods (note that automated backups max out at a 35-day retention period). Enter manual snapshots, the customizable option for DB administrators to dictate the number of backups, retention periods, and even share backups across different regions or accounts.
However, unlike automated backups, manual snapshots don’t come with an expiration date. This is where the headaches begin for FinOps practitioners.
| Feature | Automated Backup | Manual Snapshot |
| Backup Creation | Automatically created by RDS | Manually created by DB administrators |
| Retention Period | Up to 35 days | No predefined retention period; must be managed manually |
| Backup Frequency | Daily | Hours/Days/Weekly |
| Scheduling | Managed by RDS | Customizable by Admins |
| Cost Visibility | Often hidden within RDS costs | More transparent, but can accumulate unnoticed |
| Deletion | Automatically managed | Must be manually deleted to avoid cost accumulation |
How to enable detailed cost using Tags
The first step in optimizing your RDS costs is to gain a clear understanding of them by creating visibility. In this step, we’ll explore how to use AWS Cost Explorer to view your RDS costs. We’ll assume that you haven’t enabled tagging for your databases and snapshots yet. Eventually, we will delve into how to tag databases and snapshots to obtain detailed information about snapshot costs.
How to view RDS backup cost via Cost Explorer
First step in optimizing is to understand the cost, create visibility, in this step we will look at how to view RDS cost using AWS Cost Explorer, in this step we assume that you don’t have tags enabled for your databases and snapshots. We will eventually explore how to tag databases and snapshots and get detailed information about snapshot cost.
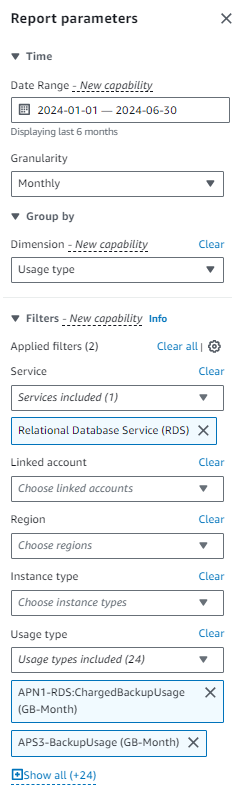
To view RDS backup costs in AWS Cost Explorer, follow these steps:
- Open AWS Cost Explorer:
- Sign in to the AWS Management Console.
- In the AWS Management Console, go to the Billing and Cost Management dashboard.
- Select Cost Explorer from the navigation pane.
- Set the Date Range:
- In Cost Explorer, choose the date range for which you want to view the RDS backup costs.
- You can select predefined ranges or set a custom date range.
- Filter by Service:
- To narrow down the costs to RDS backups, you need to filter by service. In the Filters pane on the right, select Service.
- In the Service drop-down list, select Amazon Relational Database Service. This will include all RDS-related costs.
- Filter by Usage Type:
- To further refine the data to specifically show backup costs, you can add a filter for the usage type.
- In the Filters pane, select Usage Type.
- Look for usage types related to backups. These are usually labeled with terms like RDS:chargedBackup, backupusage.
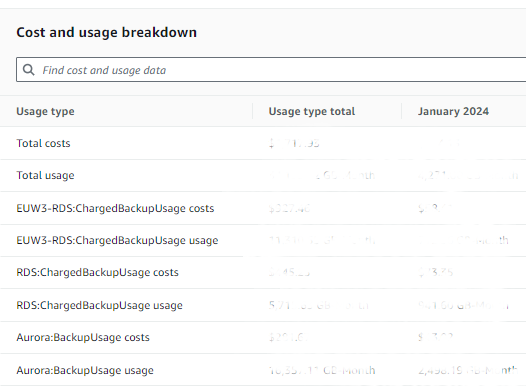
- View the Costs:
- After applying these filters, Cost Explorer will display a graph and table with the filtered costs.
- You can further break down the costs by adding additional filters or groupings (e.g., by region, account, or tags) to get a more detailed view.
As you can see, the high-level view of RDS backup charges doesn’t provide enough detail to identify which databases incur the most expensive backup costs. In the next step, we will explore how to tag databases and snapshots to gain a more detailed understanding of these costs.
Tag your databases to view detailed cost
Tagging your RDS databases is like labeling your office lunch – it makes everything easier to find and manage. The best part? When you tag your RDS databases, it automatically tags the backups of manual snapshots, too.
Following are typical tag key pairs
Example Tags
- Key name: application-name |Value: MyApp
- Key name: db-name |Value: MyDatabase
- Key name: Environment |Value: prod
Steps to Tag a RDS Database
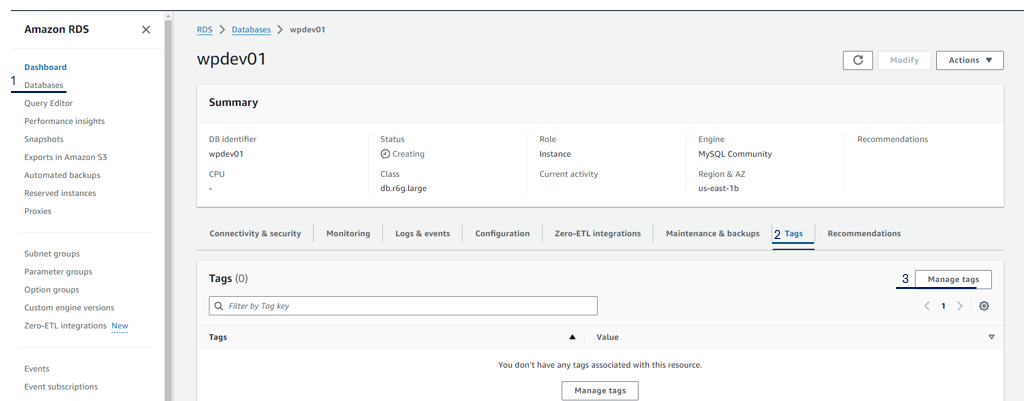
- Open the RDS Console:
- Sign in to the AWS Management Console.
- Navigate to the Amazon RDS service.
- Select Your Database:
- In the RDS dashboard, click on Databases in the left-hand menu.
- Select the database instance you want to tag from the list.
- Add Tags:
- With your database instance selected, go to the Tags tab.
- Click on Manage tags to create a new tag.
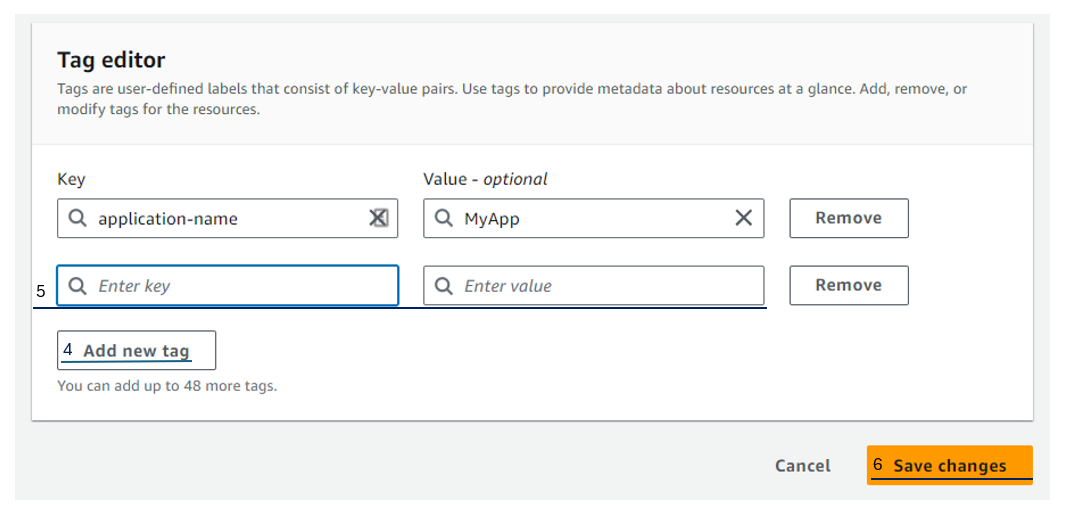
- Click on Add new tag
- It will create a new key pair on screen
- Enter Tag Key and Value:
- For the first tag:
- Key name: application-name
- Value: (Your application name which uses this DB)
- Click Add tag again to add more tags.
- For the second tag:
- Key name: db-name
- Value: (Database name)
- For the third tag:
- Key name: Environment
- Value: (If it is dev, staging, or prod)
- For the first tag:
- Save Tags:
- After adding all the tags, click on Save changes.
Enable Cost Allocation Tags at the Organization Level
To enable cost allocation tags for your AWS organization, follow these steps:
- Sign in to the AWS Management Console:
- Use an account with permissions to modify billing settings (usually an AWS Organizations Management account).
- Open the Billing and Cost Management Console:
- From the AWS Management Console, navigate to Billing and Cost Management.
- Navigate to Cost Allocation Tags:
- In the left-hand menu, click on “Cost Allocation Tags” under the “Cost Organization” section.
- Activate Cost Allocation Tags:
- From the user-defined cost allocation tags list, select the tag keys required.
- If AWS-generated tags (like aws:createdBy) are needed, click on the AWS generated cost allocation tags tab and enable the required tags.
- Select the tags you want to activate and click on “Activate”.
- Apply the Custom Tags to Resources:
- Navigate to the Resource Groups section in the AWS Management Console.
- Select the resources (e.g., RDS instances) you want to tag.
- Click on “Manage Tags” and apply the tags application-name, db-name, and environment to these resources.
- Activate Custom Cost Allocation Tags:
- Go back to the Cost Allocation Tags section in the Billing and Cost Management Dashboard.
- Find the custom tags you created (application-name, db-name, environment).
- Select the tags you want to activate for cost allocation and click “Activate”.
Note:
-Only organization admin can enable tags at root account level.
-Tag activation might take from 24 to 48 hours to reflect in the system
How to view the detailed RDS Snapshot cost in cost explorer
Follow these steps to view detailed RDS snapshot costs in AWS Cost Explorer:
- Open AWS Cost Explorer:
- Sign in to the AWS Management Console.
- Navigate to the Billing and Cost Management Dashboard.
- Click on “Cost Explorer” from the left-hand menu.
- Create a New Report:
- In Cost Explorer, click on “Create report”.
- Select “Cost and Usage Report”.
- Set Time Period and Filters:
- On the report creation page, select the desired time period under the “Date range” selector.
- Set Filters for RDS and Backups:
- Under the “Filters” section, click on “Service”.
- Search for and select “Amazon Relational Database Service”.
- Under “Usage type”, filter by the term “Backup” to include only the backup-related costs.
- Add Tag Filters:
- Under the “Tags” section, click on “Tag”.
- Select the tag key “application-name”.
- Choose the desired tag values (or all values) for the application-name tag to filter the costs by this key.
- Group the Report by Tags:
- In the “Group by” section, select “Tag”.
- Choose the tag key “application-name” to group the cost data by the application name.
- View the Report:
- Click on “Apply” to generate the report.
- The resulting report will display the cost and usage (in GB-month) for all the RDS snapshots, grouped by the application-name tag.
How to delete manual snapshots automatically
In the previous steps we have understood which database snapshots have been expensive, in this step we will write a Lambda function to automatically delete the manual snapshots periodically. In the following steps, we will automatically delete manual snapshots older than 7 days in Amazon RDS, you can create an AWS Lambda function that is triggered by an Amazon CloudWatch Events rule.
Create an Lambda Function
Step 1: Create an IAM Role for Lambda
- Sign in to the AWS Management Console and open the IAM console.
- Create a new role with the following permissions:
- AWSLambdaBasicExecutionRole: Provides basic Lambda execution permissions.
- AmazonRDSFullAccess: Provides full access to RDS (ensure to use the least privilege principle for production environments).
- CloudWatchEventsFullAccess: Provides access to create CloudWatch events.
Step 2: Create the Lambda Function
- Open the AWS Lambda Console and click on “Create function”.
- Choose “Author from scratch”.
- Enter the function name (e.g., DeleteOldRDSSnapshots).
- Select the runtime as Python 3.x.
- Under “Permissions”, choose “Use an existing role” and select the IAM role created earlier.
- Click “Create function”.
Step 3: Add the Lambda Code
In the Lambda function editor, replace the default code with the following Python script:
import boto3
from datetime import datetime, timezone, timedelta

def lambda_handler(event, context):
    rds = boto3.client('rds')
    snapshots = rds.describe_db_snapshots(SnapshotType='manual')

    # Define the age limit
    age_limit = datetime.now(timezone.utc) - timedelta(days=7)

    for snapshot in snapshots['DBSnapshots']:
        snapshot_time = snapshot['SnapshotCreateTime']
        snapshot_id = snapshot['DBSnapshotIdentifier']

        if snapshot_time < age_limit:
            print(f"Deleting snapshot {snapshot_id} created on {snapshot_time}")
            rds.delete_db_snapshot(DBSnapshotIdentifier=snapshot_id)

    return {
        'statusCode': 200,
        'body': 'Old snapshots deleted successfully'
    }
Deploy the Lambda function by clicking “Deploy”.
Create a CloudWatch Events Rule
- Open the Amazon CloudWatch Console and go to “Rules”.
- Click “Create rule”.
- Under “Event Source”, choose “Event Source” and then select “Schedule”.
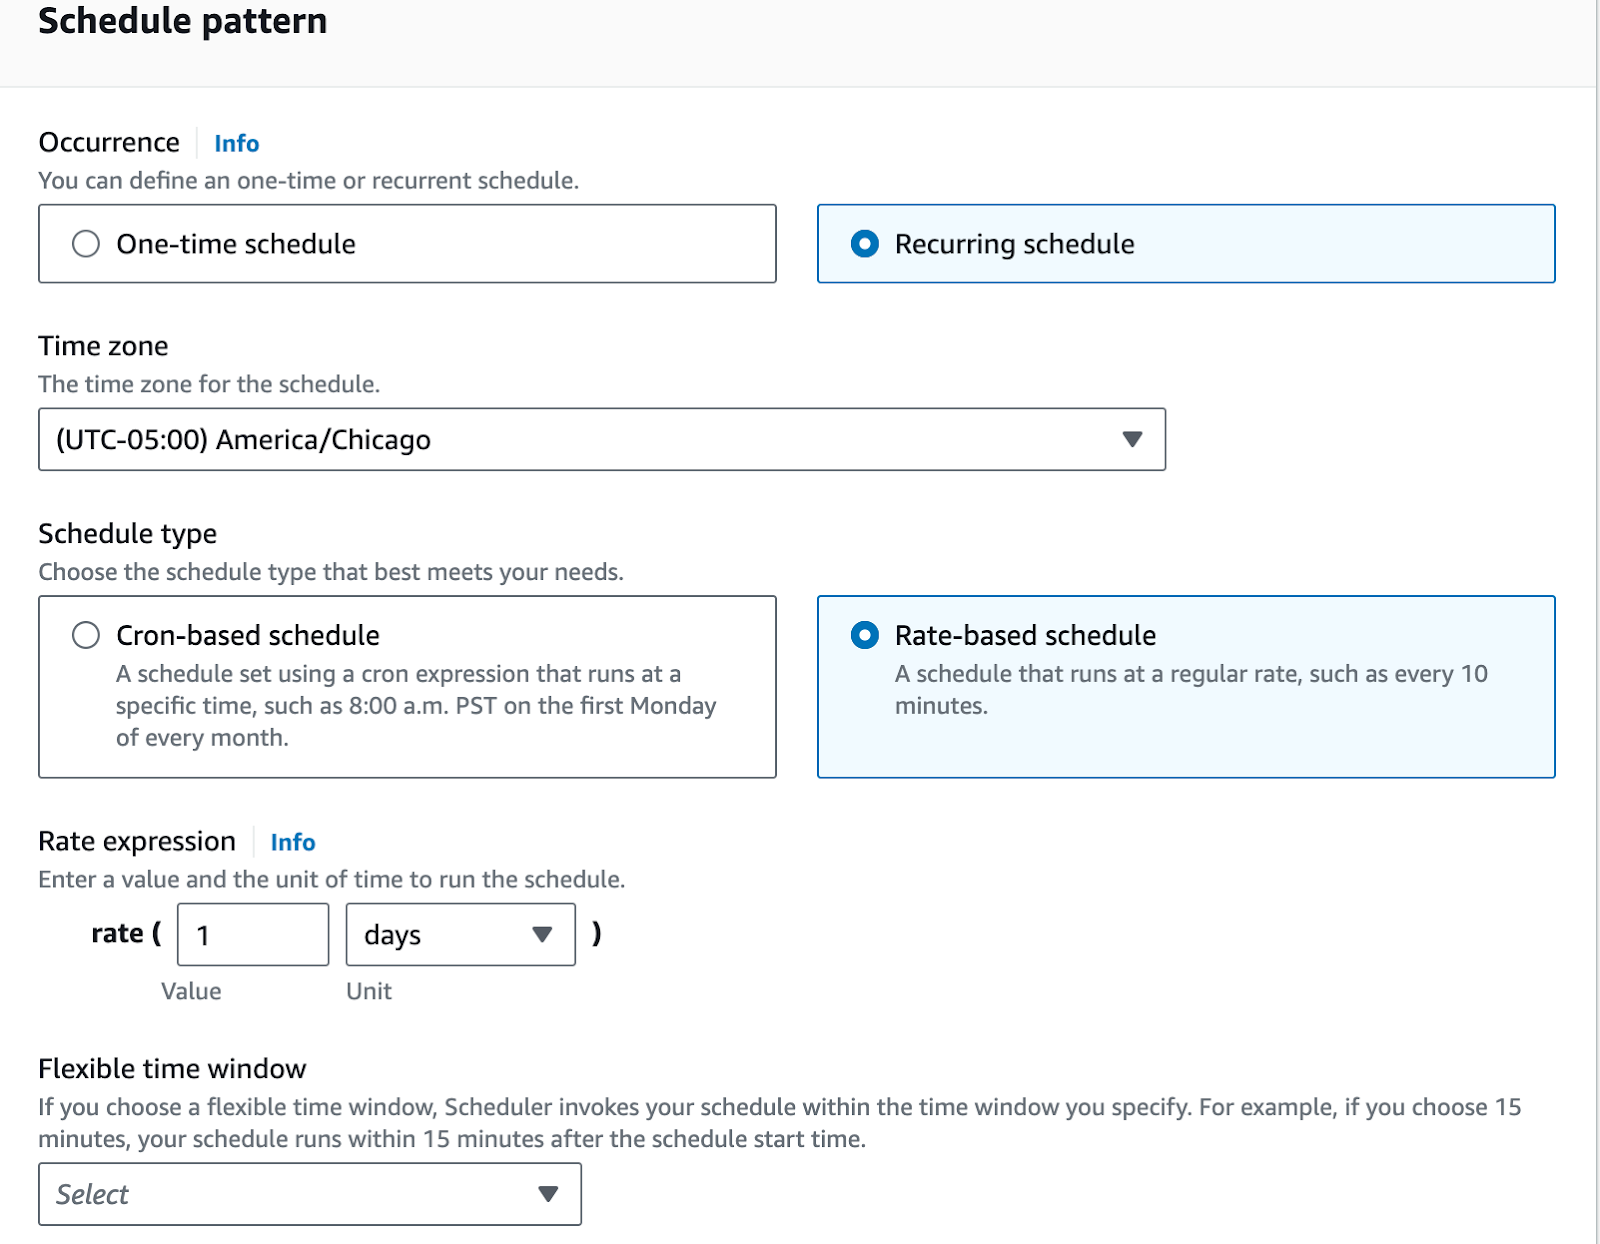
- Set the schedule expression to run daily (e.g., rate(1 day)).
- Under “Targets”, choose “Add target” and select “Lambda function”.
- Select the Lambda function you created earlier.
- Click “Configure details” and enter a name and description for the rule.
- Click “Create rule”.
Conclusion
By gaining visibility into RDS backup costs and implementing effective tagging strategies, you can significantly optimize your cloud expenses. Using AWS Cost Explorer and automated solutions like AWS Lambda for managing manual snapshots ensures you stay on top of costs. These steps will help you achieve better financial governance and cost efficiency in your cloud operations.